If you look closely at different style saw blades, you will see the differences in how the blade’s teeth are positioned, and their tooth patterns. This page will explain what they are called, and what type of cutting they’re typically used for, so you can make the right choice for your project. Hopefully, you will save yourself some time and headaches. The 3 most common types of teeth design are the Alternate Top Bevel (ATB), Flat Top Grind (FTG) and Triple Chip Grind (TCG). These tooth designs are made in both thin kerf and full kerf blades.
Here’s an example on how to measure for cuts taking the kerf of the blade into account.
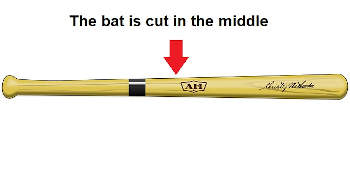
Let’s say you have a baseball bat that’s 30 inches long. You want to cut the bat in half, so you end up with a 15-inch barrel (the thick half) and a 15-inch handle (the thin half). You cut the bat in half with your saw. It looks great! You cut the bat right in the middle. Now you have the thin handle and the thicker barrel that are the same length.
When you cut the bat in half, you end up with the handle and the barrel.
Now you measure both to make sure they are both an equal 15” long. But they’re not. Both are a bit shorter than 15” now. Both are the same length of 14- 15/16”- a touch shorter than 15 inches. The reason for this is the kerf of the saw blade was 1/8 of an inch. The kerf is the width of the saw blade and the amount of material removed during a cut.
The saw blade removed 1/8 of an inch of wood when it was making the cut. Divide the 1/8″ in half to determine how much extra wood was removed each half of the bat, that is 1/16″ on each side. That is why both halves of the bat are 14- 15/16 inches and not 15 inches. The saw blade didn’t just cut the bat in half- it removed all the wood in the path of the saw blade. The width of the material removed is called the kerf.
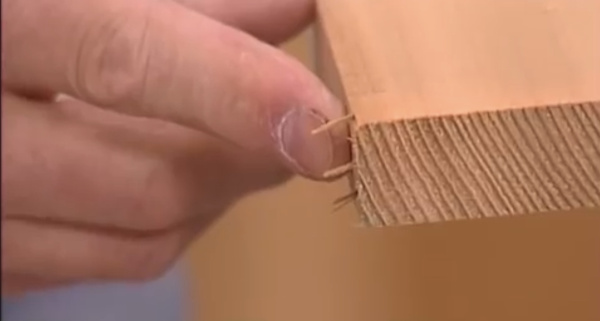
You want cuts that are clean and crisp. Tearout is most likely when making crosscuts, or cuts across the grain. Being proactive about reducing and eliminating tearout is an easy way to save yourself some time when it comes to finishing the wood. Preventing tearout is easy if you take a few extra steps before making the cut.
Table saw kickback is a serious concern when using a table saw. A table saw spins the saw blade with A LOT of torque. It’s not an exaggeration to say that a table saw can kickback a large piece of wood 20 feet through a piece of sheetrock. You’ll want to stay out of harm’s way because you will be injured if that woodpiece hits you, or even grazes you. You’ll be lucky if you walk away with a bruise or a scratch.
What is Table Saw Kickback?
Table saw kickback
Kickback occurs when the workpiece gets pinched or pushed back onto the backside of the saw blade. The rear of the saw blade spinning so the blade is coming up towards the ceiling. The saw blade catches the wood, drags it over the top of the saw blade and fires it like a bullet back towards the direction the saw blade is spinning. Kicked back wood can come straight back, but usually, it will come off the blade at an angle away from where your fence would be. Here are some tips to prevent kickback on a table saw.
There are 2 possible answers. The blade should barely come above the wood you are cutting, or the blade should be well above the wood you are cutting. The answer isn’t obvious as there are pros and cons to each method. But in the end, I hope you see that one way is superior to the other.
The Safest Cut
Table saw blade at approximately 1/8″ above the workpiece.
It’s my opinion that the best cut is the safest cut. I don’t
want to lose a finger when I could have gotten away with a few stitches or a
band-aid. With that in mind, the safest height to set a table saw blade is so
it’s just above the wood you are cutting.
The general rule of thumb is that the blade should be set so it is 1/8” above the workpiece. If you make contact with the blade with your hand at this height, you’re unlikely to lose a finger. That’s enough reason for me to be on the barely above the wood side of this question.