
(photo credit: Mathias Wandel/Youtube)
A zero clearance insert (ZCI) is a one of the most beneficial accessories you can use with a table saw. It’s a replacement for the throat plate that comes with your table saw. The purpose of a zero clearance insert is to bring the distance between the saw blade and the nearest supporting surface down to zero. As in zero clearance. In other words, there is no gap between the table saw top and the saw blade. The insert is as close as it can to the saw blade without physically touching it.
Page Contents
The Benefits of using a Zero Clearance Insert with Your Table Saw
- To prevent small pieces of wood from falling into the gap around the table saw blade while cutting. This helps prevent dangerous table saw kickback, which can injure you. It also prevents wood from falling into the gap and jamming the saw blade. If a piece of wood falls in, it can get caught in a position where it forces the saw blade to stop spinning. This puts considerable strain on the table saw motor, and could burn the motor out.
- Reducing the amount of tearout and chipout that can occur with the factory throat plate or a standard insert. ZCI’s reduce tearout and chipout by ensuring that the workpiece has support on all sides during a cut. The support helps prevent wood fibers from getting pulled away from the workpiece as the blade advances through. The less open space you have under your workpiece, the greater control you have over the cut, and the quality of the cut.
- Improved sawdust collection. With a ZCI, there is virtually zero opening for sawdust to come back onto the table saw. Almost all sawdust is directed into the dust chute, making for less mess and easier cleanup.
What is a Zero Clearance Insert Exactly?
A ZCI is a replacement for the throat plate of a table saw. It is the same size, shape and thickness of the standard throat plate that comes with your table saw. It can be made from wood, plastic, MDF or any material that it easily cut by the same tools used to cut wood. It sits on the same tabs around the saw blade as the throat plate. A ZCI will have the same dimensions as the standard throat plate.
As stated earlier, the purpose of a zero clearance insert is to bring the distance between the saw blade and the nearest supporting surface of the table saw top down to zero.
The opening in the ZCI matches the exact width of the saw blade, or kerf. There isn’t any extra clearance around the saw blade like there is with the standard table saw throat plate.
Is a Zero Clearance Insert Better Than the Throat Plate That Comes with the Table Saw?
There really isn’t a time where you wouldn’t be better off using a ZCI. However, just because ZCI’s exist, that doesn’t mean that the throat plate is useless. It’s a hassle to make and store ZCI’s for every saw blade and every bevel angle. So, it’s convenient to use the standard throat plate for non-critical cuts or when making cuts with uncommon bevel angles.
(photo credit: woodgears.ca)
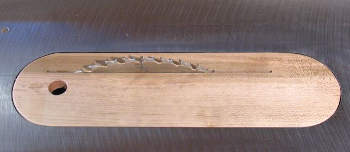
The throat plate is designed to allow clearance for the saw blade across the table saw’s entire range of bevel angles. It allows so many angle settings by having more clearance around the saw blade, whereas a ZCI has zero clearance around the blade.
Standard throat plates are more convenient to use if you are making many one-off cuts that require different bevel angles, and cuts where smooth clean-cut edges aren’t a necessity.
Limitations When Using Zero Clearance Inserts
Since a ZCI is calibrated to a specific saw, a specific blade, and a specific bevel angle, it can only be used on cuts where those parameters are met. Once a ZCI is made for a straight-on 90° cut, it can’t be used on other cuts. If you need to make a 45° bevel cut, you can’t use your 90° ZCI. You must have a 45° ZCI, or swap in the throat insert.
Each zero clearance insert is good for only one specific bevel angle, so you need quite a few ZCI’s to cover the most common bevel angles. And even more if your cutting with dado blades on your table saw. You don’t have to be overwhelmed if you need quite a few ZCI’s, they’re pretty easy to make.
How to Make a Zero Clearance Insert
Let me start off by saying that if you plan on taking the time to make 1 or 2 ZCI’s, take more time to make some extra blank inserts to have on hand. So, when you have an odd bevel or dado cut that needs a ZCI, you already have a blank insert ready to go. This is a real time saver.
Instructions for making a ZCI
- Measure the throat plate’s thickness or measure the distance from the throat plate support tabs to the top of the table. Typically, this will be 1/2-inch or less.
- Now locate a sheet of plywood or MDF that is the same thickness as you measured. Slightly thinner is OK, but thicker will not work.
- Next place the table saw’s original throat plate face down onto the plywood or MDF and trace the outline of the throat plate. Outline a few extra blanks if there is space.
- Cut out the outlined inserts. A band saw is the easiest way that I’ve found to do it. But you could use a jigsaw, or even a plunge router if your hand is steady enough.
- Lower the table saw blade all the way down and place the ZCI into the throat slot. The insert should fit snug, but not snug enough that you are forcing it into the slot. If your table saw has a riving knife, it needs to be removed at this point. I will discuss using a ZCI with a riving knife further down on the page.
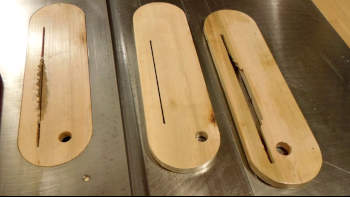
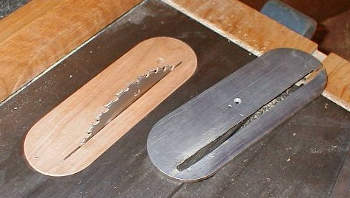
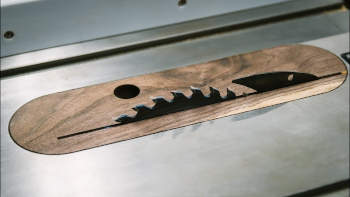
- Set the bevel angle on the saw blade for the ZCI. Turn on the table saw and slowly raise the blade all the way up. The blade will cut through the insert giving you a slot for just the saw blade. It is now a zero clearance insert for that specific blade and that specific bevel angle.
- You may have trouble easily getting the insert out at this point. So, remove the ZCI without damaging it and drill a ¾-inch hole near the front edge but away from the blade slot. This will serve as a finger hole so you can easily remove the insert from the table saw.
- Optional- sand the top face of the ZCI to give a smoother surface. This helps to reduce friction while making cuts.
- Finally, after making a ZCI for a specific setup, mark it with the angle setting and the blade it partners with, so it’s easy to locate next time you need it.
Downsides of Using Plywood and MDF for ZCI’s
I recommend using plywood or MDF to use for your inserts. Plywood and MDF are cheap and readily available for purchase. This makes them a good choice of material in my eyes. The downside being that plywood and MDF are not the smoothest materials to use on a table saw top. That is the reason I sand my plywood/MDF inserts. It makes wooden workpieces slide smoother over the table saw top.
Plywood and MDF are also not the most resilient materials. They wear down faster with use over time than hardwoods. Eventually plywood/MDF need to be replaced due to wear and tear. This isn’t a big deal, but it is a consideration.
Plywood and MDF are also affected by fluctuations in humidity. The insert needs to fit into the opening around the saw blade snug. In high humidity conditions, the ZCI may not fit into the throat slot because of expansion. This is not common, but it is a situation that can pop up from time to time.
Other Materials to use for Zero Clearance Inserts
Hardwoods
Hardwoods are an option. They are more resilient to wear and tear than plywood and MDF. But using hardwood will come at an increased up front cost. That cost will be mitigated somewhat by hardwood lasting longer than plywood and MDF. Hardwoods are also sensitive to the same issues with humidity as plywood and MDF. In my opinion, it’s more practical to use plywood or MDF over hardwood.
Phenolic Resin
The latest material of choice is phenolic resin, or phenol resin. Phenolic resin is a synthetic polymer. You can purchase it in sheets like plywood, which makes it easy to use when making inserts. You will not find it in a local big box store though. I’ve only seen it available online. It is on the expensive side, but it is the ideal choice for ZCI’s.
Phenolic resin keeps its shape and size under all conditions- humidity and temperature have no effect on it. It lays flat in the throat slot and provides stable support while cutting. It’s extremely resilient to the normal wear and tear of table saw use, and wood slides smoothly over it without sanding. The best part is it can be cut, shaped and machined using the same blades and tools you normally would use on wood. Overall, phenolic resin is the superior material, but cost and availability are the main drawbacks.
How Many Inserts Do You Need?
It’s a good idea to have a ZCI for all your basic cuts. A ZCI for your table saw blade bevel set at 90° and 45° are basics. If you make a lot of cuts with the bevel angle at 30°, then it’s a good idea to have an insert for that. If you use dado blades, then you will need a ZCI for each dado blade and setup.
You don’t want to make and cut out an insert in the middle of a project. That’s always a major momentum killer for me. I hate being in the middle of a project and get side-tracked by something that could have been prevented. Therefore, it’s a good idea to make extra inserts to have on hand.
Zero Clearance Inserts and Dado Blades
The standard throat plate that comes with your table saw isn’t wide enough to use with a dado blade. Any time you want to use cut with dado blades or dado sets, you must remove the throat plate. Using a table saw without the throat plate is unsafe for many reasons- kickback, things falling into the table saw motor, etc. A zero clearance insert solves these problems.
Keep in mind that you’ll need quite a few zero clearance inserts for the different dado blades and dado sets you use. Every dado set up is different regardless of what order the individual blades are stacked. Yet another reason why it’s a good idea to have extra blank inserts on hand.
Using a Zero Clearance Insert with a Riving Knife
When you make your own ZCI there is no opening for the table saw’s riving knife. That becomes a problem when you want to use your ZCI with the added safety of a riving knife. A riving knife is the best tool for preventing table saw kickback. You can’t just cut a slot in the back of the insert for the riving knife. If you do that, the ZCI would be almost cut in half, compromising its structural integrity.
(photo credit: Wm. Walker Co./Youtube)
The solution is to cut a slot for the riving knife while keeping the integrity of the insert intact. The easiest way to cut the opening is to use a drop router to cut the slot where the riving knife raises with the blade. Mark the length of the riving knife and use the drop router to cut the opening. With a drop router, you will not have to cut all the way through the rear of the insert to make the opening for a riving knife.
You can also turn the ZCI upside down, place it on the table saw and carefully continue the cut to the length needed for the riving knife.
A bandsaw or a jigsaw can also cut the opening for the riving knife. But with either of those saws, you will end up cutting the insert almost in half. To solve this problem, glue in a strip of wood to close the gap at the rear of the insert.
Buying an aftermarket ZCI can make life easier because they already cut the slot for the riving knife opening.
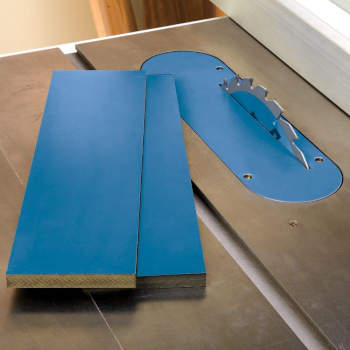
Aftermarket Zero Clearance Inserts
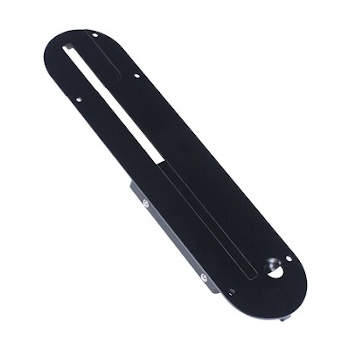
A lot of manufacturers make zero clearance inserts for most model table saws. They are pre-cut for both the saw blade and a riving knife or splitter. It’s easy to find ZCI’s that will fit your table saw- all you need to know is the model of your table saw and the blade or dado you will use the insert with. If you need more than a few inserts for different bevel angle, or quite a few inserts for dado sets, the price can add up quickly.